Hướng dẫn cài đặt TIG Stack trên CentOS 7
Bài hôm nay Bizfly Cloud sẽ cùng các bạn thực hiện cài đặt TIG Stack trên CentOS 7
1) Cài đặt InfluxDB
Bước 1: Tạo repo cho InfluxDB
# vi /etc/yum.repos.d/influxdb.repo
Thêm vào nội dung sau :
[influxdb]
name = InfluxDB Repository - RHEL $releasever
baseurl = https://repos.influxdata.com/rhel/$releasever/$basearch/stable
enabled = 1
gpgcheck = 1
gpgkey = https://repos.influxdata.com/influxdb.key
Cập nhật lại các repo:
# yum repolist
Bước 2: Cài đặt InfluxDB
# yum install influxdb -y
Bước 3: Khởi động dịch vụ và cấu hình khởi động cùng hệ thống :
# systemctl start influxdb
# systemctl enable influxdb
Bước 4: Cho phép các port 8066 và 8088 đi qua FirewallD :
# firewall-cmd --permanent --add-port=8086/tcp
# firewall-cmd --permanent --add-port=8088/tcp
# firewall-cmd --reload
Bước 5: Kiểm tra trạng thái dịch vụ
# systemctl status influxdb

Bước 6: Kiểm tra version hiện tại của Influx:
# influx -version

Bước 7: Để lưu trữ dữ liệu cho Telegraf agents, ta sẽ setup trước database và user trên Influxdb
# influx

Lúc này ta đang kết nối đến Influx server local mặc định trên port 8086.
Bước 8: Tạo database và user cho Telegraf:
> create database telegraf
> create user telegraf with password 'P@ssw0rd'
Bước 9: Kiểm tra lại database và user vừa tạo
> show databases
> show users

Gõ exit để thoát.
2) Cài đặt Telegraf Agent
Bước 1: Cài đặt Telegraf
# yum install -y telegraf
Bước 2: Khởi động dịch vụ và cấu hình khởi động cùng hệ thống
# systemctl start telegraf
# systemctl enable telegraf
Bước 3: Kiểm tra version hiện tại của Telegraf
# telegraf --version

Bước 4: Backup file cấu hình mặc định của Telegraf
# cd /etc/telegraf/
# cp telegraf.conf telegraf.conf.bak
Bước 5: Chỉnh sửa file cấu hình telegraf.conf
# vi telegraf.conf
Chỉnh sửa các dòng sau:
...
hostname = "tig_server" (dòng 94)
...
[[outputs.influxdb]]
...
urls = ["http://127.0.0.1:8086"] (dòng 112)
...
database = "telegraf" (dòng 116)
...
username = "telegraf" (dòng 149)
password = "P@ssw0rd" (dòng 150)
...
[[inputs.cpu]] (dòng 2614)
## Whether to report per-cpu stats or not
percpu = true
## Whether to report total system cpu stats or not
totalcpu = true
## If true, collect raw CPU time metrics
collect_cpu_time = false
## If true, compute and report the sum of all non-idle CPU states
report_active = false (dòng 2622)
...
[[inputs.disk]] (dòng 2626)
## By default stats will be gathered for all mount points.
## Set mount_points will restrict the stats to only the specified mount points.
# mount_points = ["/"]
## Ignore mount points by filesystem type.
ignore_fs = ["tmpfs", "devtmpfs", "devfs", "iso9660", "overlay", "aufs", "squashfs"] (dòng 2639)
...
[[inputs.diskio]]
...
[[inputs.kernel]]
...
[[inputs.mem]]
...
[[inputs.processes]]
...
[[inputs.system]]
...
[[inputs.net]] (dòng 4793)
...
[[inputs.netstat]] (dòng 4835)
...
Bước 6: Khởi động lại dịch vụ
# systemctl restart telegraf
3) Cài đặt Grafana
Bước 1: Tạo repo cho Grafana
# vim /etc/yum.repos.d/grafana.repo
Thêm vào nội dung sau:
[grafana]
name=grafana
baseurl=https://packages.grafana.com/oss/rpm
repo_gpgcheck=1
enabled=1
gpgcheck=1
gpgkey=https://packages.grafana.com/gpg.key
sslverify=1
sslcacert=/etc/pki/tls/certs/ca-bundle.crt
Cập nhật lại các repo :
# yum repolist
Bước 2: Cài đặt grafana
# yum install grafana -y
Bước 3: Khởi động dịch vụ và cấu hình khởi động cùng hệ thống
# systemctl start grafana-server
# systemctl enable grafana-server
Bước 4: Cho phép các port 3000 đi qua FirewallD
# firewall-cmd --zone=public --add-port=3000/tcp --permanent
# firewall-cmd --reload
Bước 5: Kiểm tra version hiện tại của Grafana
# grafana-server -v

Bước 6: Setup Grafana - truy cập URL sau trên trình duyệt của client, đăng nhập với user mặc định admin/admin -> Login:
http://<ip-grafana-server>:3000
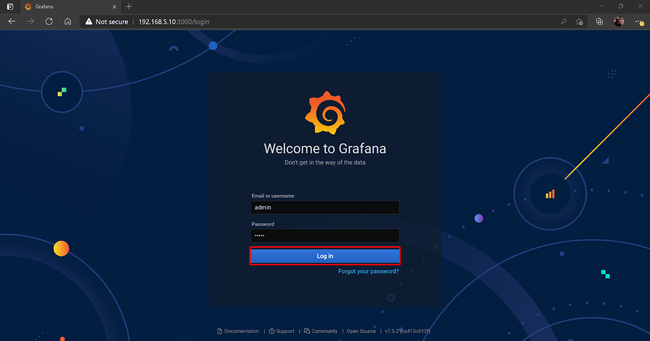
Bước 7: Grafana sẽ yêu cầu đổi password mặc định ngay lần đăng nhập đầu tiên (có thể Skip để bỏ qua)

Bước 8: Trong tab Configuration, chọn Data Sources
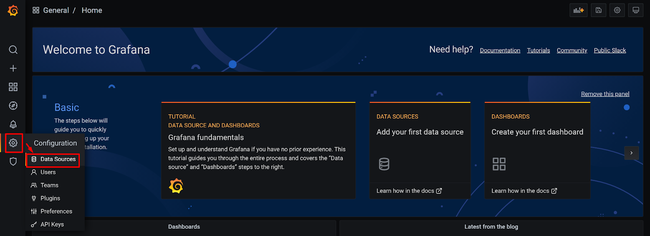
Bước 9: Chọn Add data source

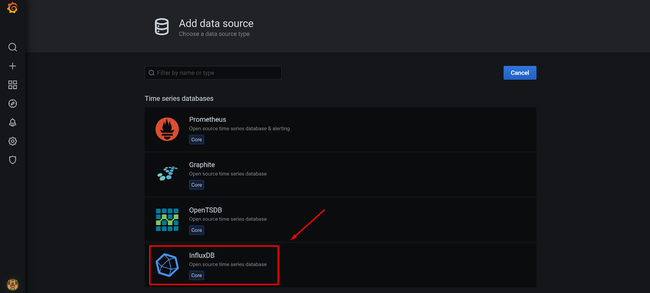
Bước 10: Chọn InfluxDB để liên kết với InfluxDB vừa cài ở trên:
Bước 11: Điền các thông tin cần thiết để giám sát Telegraf, sau đó chọn Save & Test:

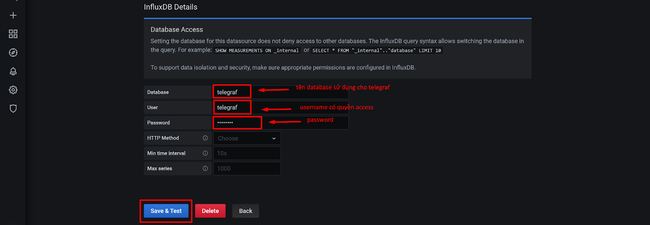
Liên kết database thành công sẽ có kết quả sau:

Bước 12: Tại tab Create, chọn Import để thêm template dashboard đã có sẵn (được public) hoặc có thể tự vẽ dashboard

Các template dashboard có thể xem thêm tại https://grafana.com/grafana/dashboards
Bước 13: Thêm ID của dashboard template, chọn Load:

Bước 14: Chọn data source, sau đó chọn Import:
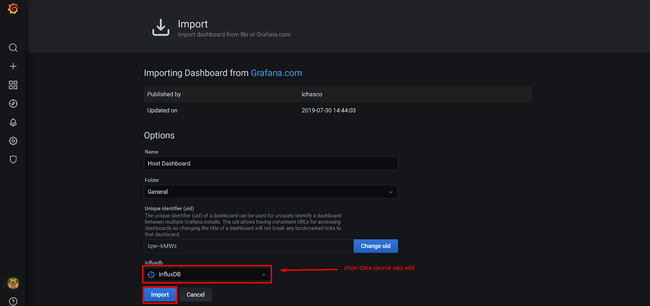
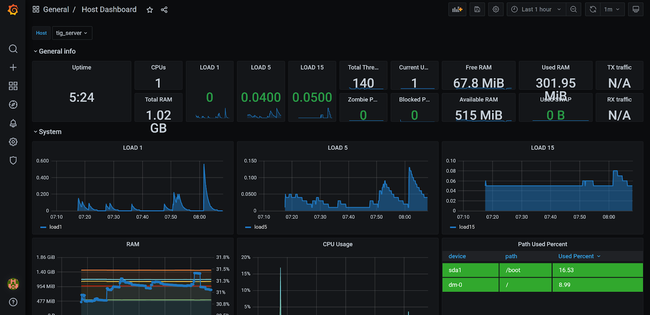
Dashboard Grafana sau khi thêm thành công:
Theo Bizfly Cloud
Bizfly Cloud là nhà cung cấp đa dịch vụ điện toán đám mây được vận hành bởi VCCorp.
Bizfly Cloud là một trong bốn doanh nghiệp đáp ứng đầy đủ toàn bộ tiêu chí, chỉ tiêu kỹ thuật, an toàn thông tin của nền tảng điện toán đám mây phục vụ Chính phủ điện tử/chính quyền điện tử do Bộ TT&TT chứng nhận.
Độc giả quan tâm đến các giải pháp của Bizfly Cloud có thể truy cập tại đây.
Hạ tầng IT/Cloud phục vụ chuyển đổi số

